
I decided to make a stationery set for my mom because she bought a desk for her newly remodeled bedroom. Its a lovely desk and I thought a nice cigar box full of hand-made stationery would be just right tucked into one of the cubby-holes. It took me a few weeks to make this box because I worked on it mainly a night or two a week.
Of course, this project has a million creative variations and no two boxes will ever look the same, but here is a (hopefully) easy to understand how-to for making your own custom cigar box stationery set.
Materials and Tools needed:
- wooden 8 x 81/2"cigar box (acrylic box or any other shape)
- wood stain
- decorative papers
- blank note cards with envelopes
- photo paper (postcards, decals, paint, etc)
- ribbon
- post cards for gift
- stickers
- vellum paper
- card stock, various sizes
- decorative cord
- buttons, vintage or otherwise
- 1 fat quarter of material
- ink, various colors
- small blank book
- paint brush
- sand paper
- small screwdriver (eye glass kit sized)
- sharpie
- hot glue gun
- spray adhesive
- scissors
- archival glue dots
- paper cutter, exacto and self-healing mat
- ruler
- bone folder
- pencil
- rubber stamps
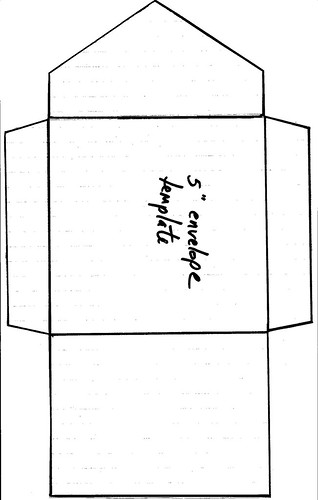
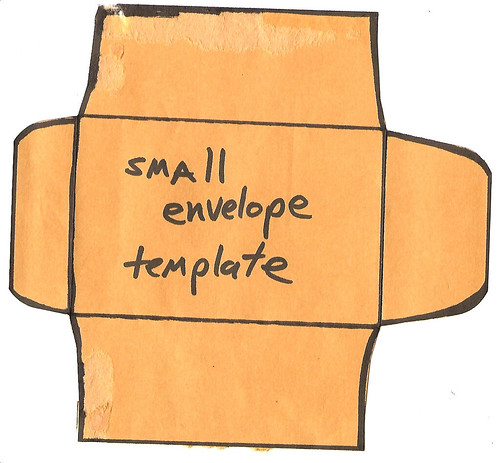
You will also need a template for a
5" square envelope, a
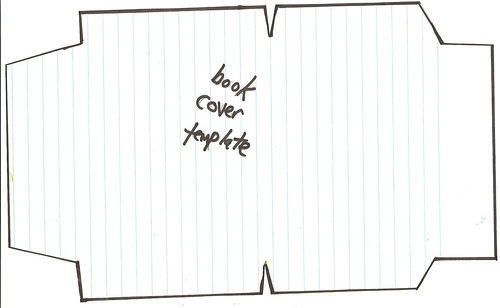
small envelope, and a
cloth book cover to fit your blank journal book. I have attached scans of my templates as hyperlinks above.
My final product included the decorated box, a small custom journal, a postcard bundle, note cards with envelopes, Tiny Treasures, postage envelope, photographs, a special item, and a personal note. For my mom, the special item was a pair of vintage garden snips with rosebuds.
Wow, ok. A step by step guide to make this......I should have taken notes......Here goes nothin'
Remove the hardware from your cigar box with your tiny screwdriver. Set them aside someplace safe from kitty tails and one year olds. Give the whole box a once-over with the sandpaper.
Using a foam brush, apply the wood stain liberally but evenly. Extra strokes are an excellent idea with wood stain. I worked over a cut open paper grocery bag with a simple kitchen rag. Do whatever works for you. One to two coats will do. Let dry.
Reinstall the cigar box hardware. Then measure and cut decorative papers to fit inside the cover and bottom of your box. Mine were 7 1/2 x 8". Adhere decorative papers to inside of box with glue dots. Using the templates, measure and cut one large and two small envelopes with your selected papers. Fold each along guidelines and use glue dots to hold the side and bottom flaps in place. If you will be decorating the envelopes, do it now.

I used rubber stamps and copper ink for the acorns and bee, and letter stickers for the word
postage. Set aside the two small envelopes, and glue the large one into the top inside cover of the box with glue dots.
Next, warm up your hot glue gun and measure and cut your ribbon to edge the outside of the box. Be really patient with the application. Do very small sections at a time and make sure to apply a very small amount of glue. It dries into bumpy clumps very easily. I used an extra glue stick as a roller to smooth over each section right after I applied the ribbon. In two sections I had some some small bumps, but overall it was very smooth.

For my box, I chose a very simple arrangement for the top. Actually, I'm not sure one bird even is an arrangement, but whatever. Print out your image (if needed) onto photo paper. I used glossy. Use the exacto knife to cut it out. Spray adhesive on the back of the cut-out and apply to the box. Use a heavy book over the area for a little while.

Now, your box is complete and you can start working on the contents. Let's start with the note cards. I stamped mine with a nice bird stamp because my mom loves to garden. As a matter of fact, her garden was just featured in a book. She even got the cover shot! Way to go, Mom!

Ok, use archival stamp ink and transparent stamps (the kind you stick to an acrylic block that you can see through). I applied the ink by hand, and stamped all the colors at once. I also stamped another bird stamp on the back flap of the envelopes. When they are dry, tie the little bundle together with some of the twine. A nice vintage button makes the bundle complete.

For the small book, have your card stock, cloth, decorative papers, spray adhesive, and hot glue gun at hand. Before you start, you should also iron your cloth. I wanted to use vintage material, but in the end I went with a newer leaf printed cotton for durability in the book creases. Using the book cover template, trace the outline onto the inside of your cloth. Cut out the cover piece and set aside. I used a small soft cover notebook and removed the existing cover pages from the guts. Cut and measure your card stock using the removed cover and also cut your inside liners from the decorative papers.

(For some reason, the pages look pink, but they're really not)
Measure the width of the spine of your page guts and score the card stock to that width. Also score the liner pieces in the middle. Having the fold in the paper will help line it up when its ready to be glued on. Use the spray adhesive on one side of the card stock for the cover. Apply liberally. Have your cloth laid out on a flat surface and place the card stock glue side down onto the cloth, lining up the covers of the cover with the corners of the flaps on the cloth. One at a time, fold the flaps down and smooth over each with the bone folder. Apply a thin line of hot glue to the area of the cover where the book spine will be placed. At this point, you could add a bookmark ribbon to the spine and then apply another line of glue to the ribbon and continue. I didn't do a bookmark, so I...
...firmly placed the book guts onto the line of glue. Make sure none leaks out the sides, if any does wipe it away with a nail or anything pointy. Then, close the book and place it under a heavy book. I use this method alot. When its set, use the spray adhesive to apply the liner paper to the very front and back pages. Smooth it down with the bone folder and place it back under the heavy book to "coagulate."

After the glue is set, make a nice binder out of twine and another pretty button. I stayed with my nature theme by using a wooden button.

Next, assemble your postcard bundle. I collect postcards, both vintage and contemporary, so I had plenty on hand, but you can find cool vintage postcards at flea markets, on eBay, or in country stores. And, of course, you can get contemporary postcards just about anywhere. Take a piece of the vellum paper and cut it to fit around your postcard bundle with just about a 1/2 inch of overlap. Wrap your postcards, use the bone folder to crease the folds, and close it with a nice sticker. I used small round stickers of real pressed flowers, but you can use any kind of sticker that fits your theme.

I included a single note card with a handwritten message. I just took some card stock and applied a stripe of the same paper I used inside the box. I had a few large strips left over from before, so I used what was already on hand, plus it coordinated.. I have a really nice embosser that my mom gave me, so I used it to emboss my initials onto the note card to give it a personal touch.

Those are all the components that have to be made. You are now ready to finish your gift!
Before I put everything together, I added a few little touches. I tucked another bird cutout inside the pages of the book, placed vintage stamps in the postage envelope, and hid feathers in the little treasures envelope. When you are done adding your finishing touches, place each item in the box, putting the largest and flattest in first. For me that was some personal photographs and the postcard bundle. Next, I put the note cards and small envelopes. On the very top, I placed the book and the special item, vintage rose snips.

When you're all done, close the box and wrap it for gift-giving! I went a more practical route and packed mine for travel.

Whoever is lucky enough to receive this handmade gift will truly feel special. My mom loved her box. The nature theme and green color scheme were just right!


 After the glue is set, make a nice binder out of twine and another pretty button. I stayed with my nature theme by using a wooden button.


